
Table of Contents
Updates to Budget Module
%20(2).png)
Instead you will have 2 options, (1) to enable the new Budget Allocations Screen or (2) to keep the new Budget Allocations Screen disabled and set-up/manage budgets by exporting and importing our budget template files via the screen pictured below. ProSpend Support team can can help you with this file if need be.
%20(2).png)
With the new Budget Allocation Screen, everything else will remain the same as it was before. You can click on the button below to access the release notes that cover how the budget module works, outside of the new Budget Allocation Screen, shown below.
![]()
%20(2).png)
The dimensions shown and made available under “Filter Allocations” (red box below) are adjusted via the back-end by the support team. As you can see, the picture on the left has all possible dimensions made available and the picture on the right only has 3 dimensions. Please reach out to them if you need these adjusted.
%20(1).png)
%20(1).png)
%20(1).png)
%20(1).png)
Supplier Item Codes
%20(1).png)
%20(1).png)

In the New Item screen (see below), the “Supplier” field is locked to the supplier under which the item is being set up. The “Supplier Item Code” field refers to the code the supplier lists for this item on their invoices. The item’s “Supplier Item Code”, along with the “Name”, will be presented to users when selecting this item in ProSpend.


Change on the Claim Screen for Currency (Amount Totals)
Desktop User Interface


Mobile User Interface
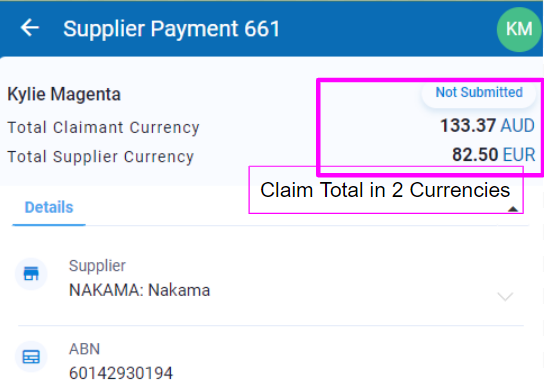


.png)

Please note, all screenshots above are for Supplier Invoices, but the feature will work the same way for Purchase Orders too. This change is being made globally across all ProSpend accounts.
Please feel free to reach out to support should you have any questions.
Change in Date Format Across ProSpend
Previously, most of the screens in ProSpend display the dates in DD/MM/YYYY format.

We have now changed the date format to be DD-MMM-YYYY.

Below are the screens that would be updated to show the new format -
- Claimant and approver home screens
- Claim screen
- Expense/item screen
- Claim search screen
- Import claims screen
- Export claims screen
- Bill cycle screen
- New bill cycle screen
- Edit bill cycle screen
- Expense report screen
- FBT report screen
- Invoice processing report screen
- Claim exports screen
- Receipts report screen
- Activity code report screen
- Audit trail report screen
- Budget report screen
- Usage report screen
- Operational dashboard
- Budget list screen
- Budget creation screen
- Workflows list screen
- User setup screen
Below are the areas that have been left unchanged -
- Claim description on claim screen
- Claim status report screen
- All the downloadable Excel reports such as expense report, claim status report and FBT report.
- All the claim summaries
- CSV credit card transactions import file
- History screens
However, if you want the below to have new date formats, please reach out to our support team -
- Expense report in Excel
- Claim status report in Excel
- Claim status report screen
- CSV credit card transactions import file
Exporting Due Dates for Supplier Invoices to Reckon Accounts Hosted
We now have an option to export due dates for supplier invoices to Reckon Accounts Hosted.


Please reach out to us via our support portal to get this enabled.

Claim ID and Expense ID Filters in the Expense Report
We have now added 2 new filters in the expense report -
- Claim ID
- Expense ID

These filters have been added for all the users who have access to this report.
You can either search for a claim or an expense by entering the IDs in one of these filters and clicking on the search button. If a user doesn't have permissions to view a claim that they are searching for, the system will show the below error.

Business Central Jobs and Job Tasks Sync
We have updated the jobs and job tasks sync for Business Central, so the system just creates -
- Jobs that are in Open status

- Job Tasks that have the type as Posting

Cancelling Purchase Orders that were Exported to MYOB Advanced
If you are using MYOB Advanced and if you're exporting purchase orders from ProSpend to MYOB Advanced, ProSpend already does the below -
- If the exported purchase order is cancelled in ProSpend, the system automatically cancels the corresponding purchase order in MYOB Advanced.
- If the exported purchase order is closed in ProSpend, the system automatically closes the corresponding purchase order in MYOB Advanced.
We are now auditing the cancellation process of the purchase orders in MYOB Advanced i.e if the purchase order is automatically cancelled in MYOB Advanced, the claim history shows "MYOB PO cancelled successfully".

If ProSpend cannot cancel the corresponding purchase order in MYOB Advanced, the claim history shows "MYOB PO cancellation failed (Missing PurchaseOrder.id)".
Exporting Foreign Currency Supplier Invoices to Quickbooks Online
If a supplier is setup with a foreign currency in ProSpend, all the supplier invoices linked to that supplier will have to be in that currency.
For example - the supplier below is setup with USD as the currency.

When a supplier invoice for this supplier is created, the system defaults the currency to be USD.

When this supplier invoice is exported to Quickbooks Online, the system will just export the foreign currency amount, in this case it is $82.50. Quickbooks Online would then default the currency based on the supplier setup and convert the amount into local currency.
We can also setup a different A/P account for each supplier in ProSpend

Open and Closed Purchase Orders
Previously, irrespective of purchase orders being open or closed, the system just showed the status as Approved or Finalised. We have now added 2 new statuses for purchase orders - Open PO and Closed PO.
If a purchase order has been Approved or Finalised and if it is still open, you will see Open status along with Approved or Finalised status.
If a purchase order has been Finalised and if it is linked to atleast one supplier invoice and if it is closed, you will see Closed status along with Finalised status (once a purchase order is closed, the system will automatically finalise it).
Claimant and Approver Home Screens
If a purchase order has been closed, you will see Closed badge in the Description column on the claimant and approver home screens. However, if a purchase order is open, you won't see any badge in the Description column. You will still see Approved or Finalised statuses in the Status column at the end.

There are also 2 new Status filters - Open PO and Closed PO which will allow you to filter open and closed purchase orders respectively.

Payer and Admin Claim Search Screen
On the claim search screen, if the purchase order is closed, you will see Closed status under Finalised status in the Status column but if it is open, the Status column will just show Approved or Finalised.
This screen also includes 2 new Status filters for Open PO and Closed PO.

Header Memo Field in NetSuite Bills Export Type
Currently, for most of our clients using NetSuite, the header memo field for bills export type is set to EMS-EXPORT-export ID. We can now customise this. For example - we can export claim links to this field, so you can easily copy and paste that link on to your browser to view the claim back in ProSpend.
.png)
Please reach out to us if you want this to be changed.
Quickbooks API - Supplier Cheques
In March this year, we developed an API for Quickbooks Online which enabled our clients using Quickbooks Online to export all claims as bills via API.
We have now improved this API, so that the credit card claims can be exported as Supplier Cheques instead of Supplier Bills.

Please reach out to us if you want this to be enabled or changed.